How to Set Up Lighting for a Video Interview at Home
Getting the lighting for a video interview at home right matters more than most candidates think. A webcam doesn’t see light the way your eyes do — it exaggerates shadows, flattens depth, and turns a slightly dim room into a murky, unprofessional frame. The good news: you don’t need a studio or expensive gear. With a window, a couple of household lamps, and 15 minutes of testing, you can look sharp, alert, and confident on camera. This guide walks you through exactly how to set up lighting for a video interview at home, from the core rule to budget setups and common mistakes.
Key Takeaways
- Position your main light source in front of you, slightly above eye level, not behind you or directly overhead.
- Use a three-point lighting setup (key, fill, back/rim) with household lamps or a window for a professional look on a budget.
- Set your camera at eye level and face a window or lamp, never a bright background, to avoid silhouettes and squinting.
- Test your lighting on the same video platform at the same time of day as your interview, then adjust before the call.
- Avoid mixed color temperatures by using bulbs of the same type (all warm or all daylight) and turning off overhead fluorescents.
| What to Do | Why It Matters | Time |
|---|---|---|
| Face a window or place a lamp behind your webcam | Eliminates shadows and makes your face the brightest part of the frame | 5 min |
| Add a second light at 45 degrees to fill shadows | Softens harsh lines and evens skin tone | 10 min |
| Set camera at eye level and sit arm’s length away | Prevents unflattering angles and keeps you in frame | 2 min |
| Test with the exact platform and time of day | Catches glare, backlight, and color issues before the interview | 15 min |
| Turn off overhead lights and close blinds behind you | Removes mixed color casts and background distractions | 3 min |
Why Lighting for a Video Interview at Home Is the First Thing Interviewers Notice
When you log into a video interview, the interviewer sees your face before they hear your answer. Poor lighting can make you look tired, unprofessional, or even disengaged. It also distracts: if half your face is in shadow or a bright window behind you turns you into a silhouette, the interviewer spends mental energy trying to see you instead of listening. Good lighting, by contrast, signals preparation and attention to detail — the same qualities employers look for in a candidate. It’s not vanity; it’s communication. For a full pre-interview checklist that covers everything from research to follow-up, see our guide on how to prepare for an interview.
The Core Rule: Light Your Face, Not the Room
The single most important principle: your face should be the brightest thing in the frame. That means your main light source — a window or a lamp — should be in front of you, slightly above eye level, and pointed at your face. Never put the light behind you, and don’t rely on overhead ceiling lights alone. Overhead light casts shadows under your eyes and chin, making you look tired. A light behind you creates a silhouette. A light from below creates harsh, unnatural shadows (the “campfire ghost” effect).
Step-by-step for a basic setup:
- Sit facing a window if possible, about 2–3 feet away. Natural daylight is soft and flattering.
- If no window, place a lamp with a shade directly behind your webcam or slightly to one side, at eye level or a few inches above.
- Angle the lamp so the light hits your face at roughly 30–45 degrees, not straight on, to avoid a flat, washed-out look.
- Turn off overhead lights and close blinds or curtains behind you to eliminate competing light sources.
Three Budget-Friendly Lighting Setups You Can Build Today
You don’t need a ring light or softbox. Here are three setups using what you likely already have.
Setup 1: Window light only (free)
- Face a window with daylight, not direct sun. Direct sun is too harsh and changes quickly.
- Sit close enough that the window fills your face with soft light, but not so close that you squint.
- If the light is too strong, diffuse it with a sheer curtain or a white bedsheet.
Setup 2: Single lamp + reflector (under $30)
- Place a desk lamp or floor lamp with a white or neutral shade behind your webcam, slightly above eye level.
- Use a white poster board, foam core, or even a piece of white paper on the opposite side to bounce light back and fill shadows.
- Position the reflector just out of frame, angled toward the shadow side of your face.
Setup 3: Three-point lighting with household lamps (under $60)
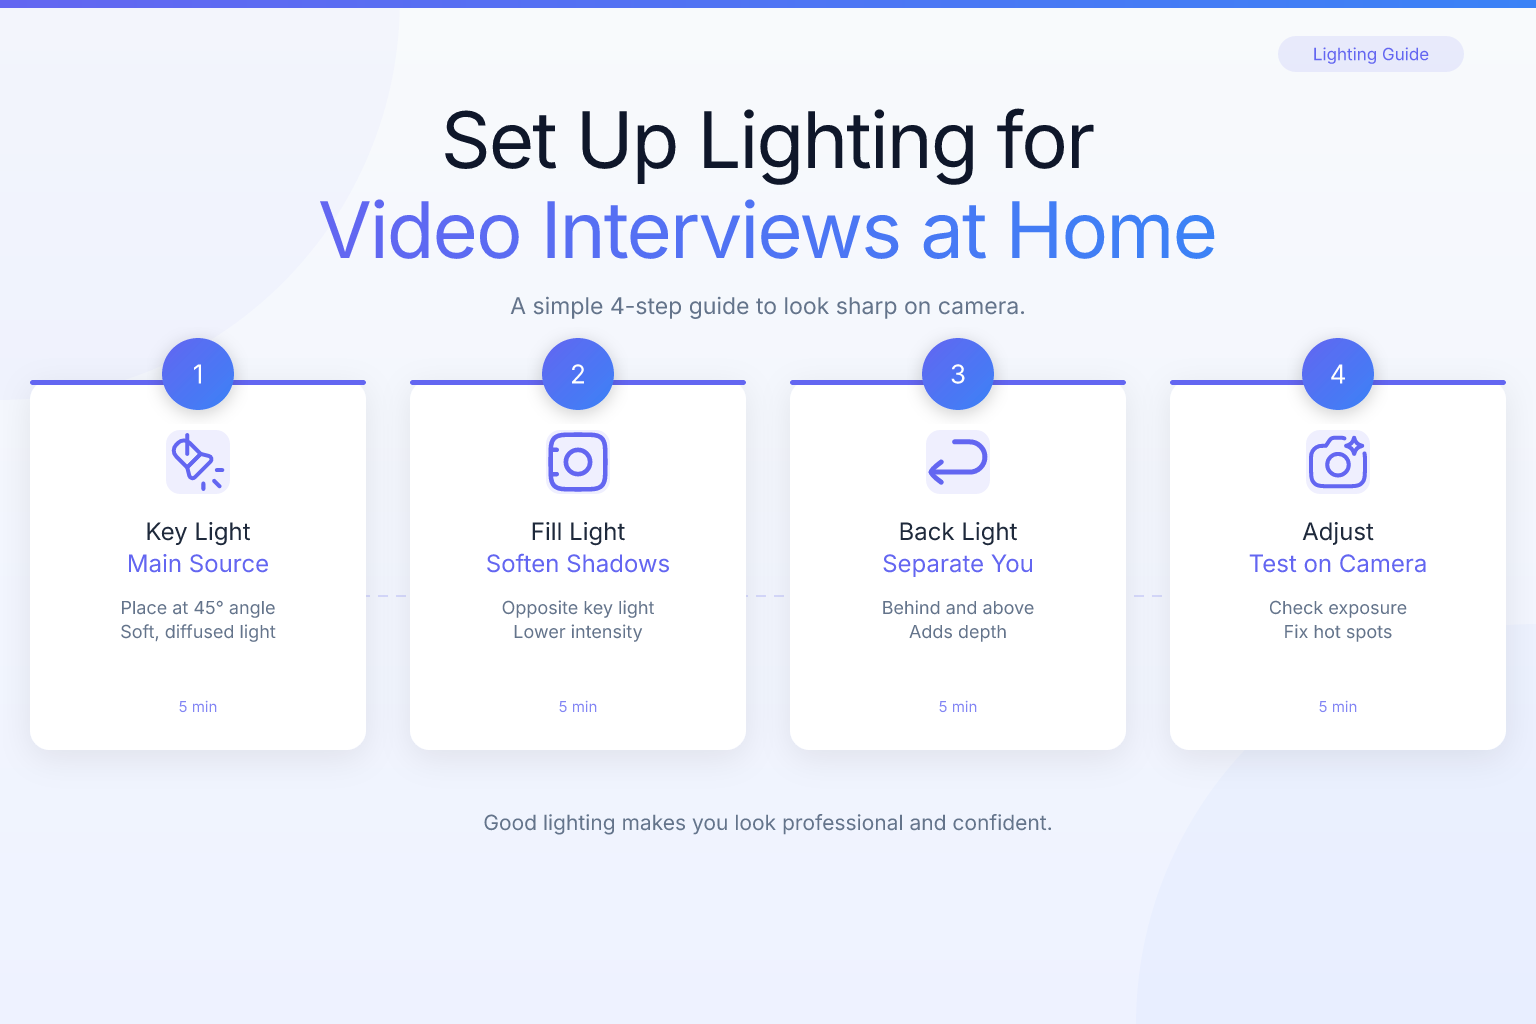
- Key light: the brightest lamp, in front and slightly to one side (30–45 degrees).
- Fill light: a second, dimmer lamp on the opposite side at half the brightness, or a reflector.
- Back/rim light: a small lamp behind you and to the side, aimed at the back of your head or shoulders to separate you from the background. Keep it dim and out of frame.
For all setups, use bulbs of the same color temperature. If one lamp is warm (2700K) and another is daylight (5000K), your skin tone will look off. Pick one and match all bulbs.
How to Position Your Camera and Yourself for the Best Light
Lighting only works if your camera angle is right. Set your webcam or laptop camera at eye level — not looking up at you from below, which emphasizes your chin and nostrils, and not looking down, which makes you appear small. Stack books or a box under your laptop if needed. Sit about an arm’s length from the camera so your head and shoulders fill the frame, with a little space above your head. Your eyes should be roughly one-third of the way down from the top of the frame. This position keeps your face in the brightest part of the light and prevents you from leaning into shadows.
Also check what’s behind you. A cluttered or overly bright background competes with your face. A plain wall, a tidy bookshelf, or a neutral backdrop works best. If you have a window behind you, close the blinds or move your setup so the window is in front of you instead.
Common Lighting Mistakes That Make You Look Bad on Camera
Most bad video lighting comes from a handful of fixable mistakes. Here’s what to avoid:
- Backlight from a window: You become a dark silhouette. Always face the window, not away from it.
- Overhead light only: Creates deep shadows under your eyes and chin. Add a front-facing lamp.
- Mixed color temperatures: A warm lamp on one side and cool daylight on the other makes your skin look patchy. Match all bulbs.
- Light from below: Laptop screen glow or a low lamp creates unnatural upward shadows. Raise your light source.
- Too dim: The camera boosts gain, adding grain and making you look washed out. Add more light than you think you need.
- Too bright or direct: Causes glare on glasses and makes you squint. Diffuse with a shade or curtain.
- Sitting too close: Your face fills the frame and every shadow is magnified. Back up to arm’s length.
How to Test Your Lighting Before the Interview (15-Minute Checklist)
Never wait until the interview starts to see how you look. Test at the same time of day as your interview, because natural light changes. Open your video conferencing app’s preview window or your computer’s camera app, then run through this checklist:
- Record a 30-second clip of yourself talking, then watch it. Your eyes will catch issues the live preview hides.
- Check face brightness: Is your face clearly the brightest part of the frame? If not, add or reposition your key light.
- Look for shadows: Are there harsh shadows under your eyes, nose, or chin? Adjust the angle or add a fill light.
- Check the background: Is it too bright, cluttered, or distracting? Simplify it or move your setup.
- Look for glare on glasses: If you wear glasses, tilt your key light slightly higher or move it more to the side until the glare disappears.
- Confirm color: Does your skin look natural, not orange or blue? Match bulb temperatures and turn off overhead fluorescents.
- Test your internet and audio at the same time — a great-looking video is useless if you freeze or sound muffled.
If your interview is a panel or group format, the same lighting rules apply, but you may need to sit slightly farther back so multiple people can see you. For more on that format, see our guide on preparing for a group interview.
Lighting Adjustments for Glasses, Darker Skin Tones, and Small Spaces
One-size-fits-all lighting advice often fails for specific situations. Here’s how to adapt:
If you wear glasses: Glare is the biggest issue. Raise your key light higher and angle it more to the side (around 45 degrees) so the reflection bounces away from the camera. Use a diffused light source — a lamp with a shade or a sheer curtain over a window — rather than a bare bulb. If glare persists, try tilting your glasses slightly downward or moving the light farther away.
If you have darker skin: Many webcams underexpose darker skin tones, especially in dim rooms. Add more light than you think you need, and use a fill light or reflector to even out shadows. Position the key light slightly more frontal (20–30 degrees instead of 45) to reduce harsh contrast. Test with your actual webcam, not just your phone, because laptop cameras often have different exposure settings.
If you’re in a small space: You may not have room for a three-point setup. Use a single lamp bounced off a nearby wall or ceiling to create soft, indirect light. A white wall can act as a giant reflector. Place your desk against the wall and aim the lamp at the wall in front of you, not directly at your face. This diffuses the light and prevents harsh shadows in tight quarters.
What to Wear on Camera: How Clothing Affects Your Lighting
Your clothing interacts with your lighting more than you might expect. Solid, medium-toned colors — navy, charcoal, burgundy, forest green — read well on camera and don’t compete with your face. Avoid pure white, which can bloom and overexpose under bright light, and pure black, which can swallow light and make you look flat. Busy patterns, thin stripes, and shiny fabrics can create distracting moiré effects or glare. Choose matte fabrics and a neckline that frames your face without drawing attention away. For a complete guide on interview attire, including what to wear for video calls, see our article on what to wear to an interview.
FAQ
Q: What is the best lighting for a video interview at home?
A: The best lighting is a soft, diffused light source placed in front of you, slightly above eye level. A window with indirect daylight or a lamp with a shade behind your webcam works well. Avoid overhead lights and backlighting, which create shadows and silhouettes.
Q: Can I use a ring light for a video interview?
A: Yes, a ring light can work if you position it directly behind your webcam at eye level and use a low brightness setting to avoid a flat, artificial look. However, a window or a shaded lamp is often just as effective and costs nothing. The key is soft, frontal light, not the specific tool.
Q: Should I sit facing a window or with a window behind me?
A: Always face the window. Sitting with a window behind you turns you into a dark silhouette because the camera exposes for the bright background. Facing the window puts soft, flattering light on your face and keeps you the brightest part of the frame.
Q: How bright should my lighting be for a video interview?
A: Your face should be clearly brighter than the background, but not so bright that you squint or your skin looks washed out. A good test is to record a short clip and check that your facial features are visible without harsh shadows. Add more light than you think you need, then diffuse it if it’s too harsh.
Q: What color temperature is best for video interview lighting?
A: The exact temperature matters less than consistency. Pick either warm (around 2700K) or daylight (around 5000K) bulbs and use the same type for every light source. Mixing warm and cool lights makes your skin look patchy and unnatural on camera.
Q: How do I avoid glare on my glasses during a video interview?
A: Raise your key light higher and angle it more to the side, around 45 degrees, so the reflection bounces away from the camera. Use a diffused light source like a shaded lamp or a sheer curtain over a window. If glare persists, tilt your glasses slightly downward or move the light farther away.
Q: Do I need professional lighting equipment for a video interview?
A: No. A window, a desk lamp with a shade, and a white poster board as a reflector are enough for a professional look. The most important factors are light placement (in front, above eye level) and consistency of color temperature, not expensive gear.
Track Every Application While You Job Hunt
Stop losing track of where you’ve applied. The ResumeMate Job Tracker is a free Chrome extension that tracks every application, deadline, and follow-up in one place — right from your browser.